Thursday, January 31, 2013

diy thursday: homemade natural dish soap


I finally got around to making my own dish soap. One of the first diy projects I made last year was liquid hand soap and I have really liked it. So now I am finally ready to share the natural soap experience with my dishes.
 
I found a homemade dish soap recipe on Pinterest as always. It is super easy and cheap to make and takes no time. Another thing I liked about this recipe is that it only makes one portion of dish soap instead of a gallon, allowing me to test it out before I make enough to last me the year.


Ingredients
1/4 cup soap flakes
2 cups distilled water
1 Tbs distilled white vinegar
1 Tbs glycerin


Directions
 
First, grate the soap. You don't have to grate very much to make 1/4 cup.

 
Next pour the distilled water into a pot and then add the grated soap flakes.

Then heat the soap flakes in the water over medium heat stirring and making sure it doesn't boil.

Once the soap flakes have dissolved in the water, add the glycerin.
 
  Pour the soap mixture into a bowl and let it cool off.


When it is a little cooler add the vinegar (do not add vinegar if you used castile soap - see recipe below).
 
Let it cool completely and then add your soap to your dish soap bottle and you are ready to use it!
 
 
Modified recipe if using castile soap
 
As I mentioned in my previous post about making cleaners with castile soap, castile soap and vinegar cancel each other out.
 
I already had a castile bar of soap with citrus which I thought would smell yummy in a dish soap and citrus is a great degreaser so I decided to make a batch of dish soap with it. Knowing I couldn't use distilled white vinegar with the soap flakes, I adjusted the recipe. Instead of vinegar I added 10 drops of tea tree oil which is a natural antibacterial and antifungal essential oil. Otherwise the recipe is the same.


The difference between the two dish soaps ....
The dish soap using the castile bar of soap smelled very yummy naturally. It was however a lot thicker than the other dish soap. One of the reasons may be that I noticed the vinegar made the first soap a little thinner after I added it. The castile dish soap consistency was more snotty:) which is a common thing for homemade liquid soaps.  The first dish soap is more runny and thinner than store bought dish soap. Also, some people complain about castile soap leaving a film on their dishes. All in all, both of the dish soaps seemed to clean the dishes which is the idea behind dish soap:)
 
 
The difference between homemade dish soap and store bought dish soap...
As I mentioned above, the consistency of homemade dish soap is different than store bought dish soap which may be hard to get used to.
Another difference is that it doesn't really bubble.
Consistency and bubbles however don't indicate whether something is clean.
It is also a lot cheaper to make your own dish soap than buying natural dish soap.  

So whether or not you use natural homemade dish soap is a matter of preference ...

Wednesday, January 30, 2013

wordless wednesday


Tuesday, January 29, 2013

six eggs

 
Antony's birthday was this month. We were so blessed to see him again last year. I wrote about sponsoring Antony a while ago and now it is Michael's turn to reflect on how his first experience was meeting Antony....


By Michael, my wonderful husband
 
“How was your trip to Africa?” “Did it change you?” “What did you get out of it?” These were common questions last summer, having just returned from a mission trip to Kenya. And since I’m the pastor who not only attempted to lead the trip but who is also responsible for our church’s Global Initiatives, they are understandable questions.
But before I reflect, I have a confession to make: this was my first mission trip. As a very “churched” individual who is now a pastor, I somehow managed to avoid them. (I think I was the only kid in my youth group who missed out on the obligatory “Mexico mission trip.”)  And while I don’t think my avoidance was intentional, I do admit that over the years I’ve developed a subtle skepticism toward the traditional, short-term, over-seas mission trip. Instead of sending a team, I reasoned, why not donate the thousands of dollars you would have spent on plane tickets, food, lodging, etc. directly toward helping the impoverished people group you’re going to serve? Plus, who are we to think that we can ride into a culture-not-our-own and fix their problems? Doesn’t the very idea of a foreign mission trip smack of western arrogance? And what about the domestic mission God is calling each of us to live out in our own communities and neighborhoods every day? Poverty (both material and spiritual) is not solely a problem in developing countries but stateside as well, right? These are good questions, worth asking in any serious discussion regarding mission trips. However, as a former short-term-mission-trip skeptic, I’m now a believer.
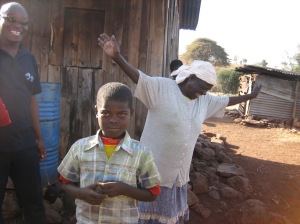
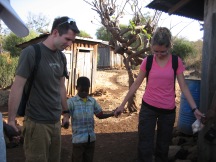
This is not the place to write a comprehensive  reflection of our entire trip. So I won’t try. Instead, I’d like to introduce you to a timid, ten-ish-year-old Kenyan boy. IMG_6704At a young age, this boy lost both of his parents to HIV/AIDS and therefore lives with his twin brother, older sister, and grandmother. His name is Antony, and if I’ve talked to you about our trip, I’ve probably mentioned him. My incredible wife has been sponsoring Antony through Food for the Hungry for the better part of seven years and has even visited him during two of her previous three trips to Kenya. But now it was my turn.
After a dusty drive down a rocky road and a brief walk through a dirt field, we arrived at their property. A quick glance around revealed a perimeter of trees and brush, a rocky ground, and three or four shack-like buildings – each roughly the size of a toolshed. Our team was promptly greeted by Antony’s spunky grandmother who remembered my wife, Signe, very well. Overcome by emotion, with hands raised, she praised God, over and over again. IMG_6670Through a translator, she then expressed that she was worried Signe had forgotten about Antony since it had been so long since her last visit. Once Signe explained that she had gotten married, the spunky grandmother responded with words and a look of understanding. Peter, our translator, turned toward us, “She said, Oh, you’re starting a family?! I understand now.”
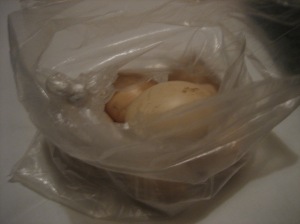
Peter then put his hand on Antony’s shoulder and brought him near to us. It was obvious he recognized Signe, but his quiet and subdued demeanor remained unbroken until we began to hand him our gifts – he cracked a small smile, but still no words. We had given him a frisbee, a notepad, some colored pencils, a pencil-sharpener, and a blanket. I wonder what he’s thinking, I asked myself. Is he excited? Nervous? Scared? Happy? Embarrassed? It was hard to tell, and I was almost a little frustrated that he wasn’t saying anything. My thoughts were interrupted when I suddenly realized he was gone. He was in front of us a second ago, but no more. Where did he go? I thought to myself, still wondering how he was feeling, still wishing he would say something. Suddenly, there he was again standing right in front of us. In his hand was a clear, plastic bag filled with six eggs, which he extended toward us. Then I understood. Antony didn’t need to say anything. In fact, words would have failed in this moment. This profound act of gratitude said it all. And it broke me.
It actually wasn’t until I was back at our guesthouse that this experience began to sink in – in the shower of all places. IMG_6721Those six eggs, which would have cost us less than two dollars at home, were probably his family’s meal for the following day. But that didn’t matter to him. All that mattered was demonstrating his gratitude by giving us this gift – a gift of tremendous value to him and his family. As I literally washed the dirt out of my hair and off of my face and arms, I realized that while I would go to bed clean, well-fed, and confident that my basic needs would be met the next day, Antony, his brother, and the hundreds of other children in the community would probably go to bed dirty, hungry, and unsure of tomorrow’s provisions. And that’s when I started crying. It was a moment of realization that I will unabashedly attribute to God. I didn’t hear an audible voice – I never have; but the ears of my heart heard it loud and clear. If I had to put it into words, it was as if God was saying, “Michael, this overwhelming sense of brokenness in your heart right now is called love. This is a gift from me and is only a tiny, tiny portion – only as much as you can handle – of the love that I feel for Antony and these children. Remember this.”
IMG_6697God loves the poor. He just does. And shame on me for forgetting that. Shame on me for complaining about stupid things that only a comfortable American would complain about (like there being nothing good on TV or a barista getting my drink order wrong). Shame on me for not loving the poor. And no, this is not a rhetorically savvy way of saying to whomever may be reading this, Shame on you! This is my journey and I pray I continue to be changed as I walk it.
So how was my trip to Africa? Good. Did it change me? Yes. What did I get out of it? Six eggs.

Saturday, January 26, 2013

welcome baby b


michael's sister had this cute and adorable little girl this week.
we got to meet her over skype yesterday:)
 

Friday, January 25, 2013

tillykke idag


on my birthday michael taught some of our friends to sing happy birthday (tillykke idag) in danish. they did a great job. so fun:)

Thursday, January 24, 2013

diy thursday: dryer balls


Staying with the laundry theme, I made dryer balls last week. I had been wanting to make them for a while as they are a completely natural and non-allergenic alternative to dryer sheets. AND they cut down the drying time. All in all, these lovely balls should save us money while also not adding any additional chemicals or the like to our laundry (we have both had issues with washing detergents and such causing irritation).
I found good directions on how to make dryer balls on Pinterest.  They are super easy to make and they will last for a long time... even years.

To learn more about how wool dryer balls work and their benefits go here.


What you will need...
100% wool yarn
pantyhose
needle


Directions
  
Make sure you have 100% wool yarn - not some combination of wool and acrylic yarn. All you have to do is make a ball. 


To start the ball wrap the yarn around two fingers twenty times. Then slip it off the fingers and wrap the yarn around the middle twenty times. Finally, scrunch the ends of the yarn ball together and begin wrapping the yarn around forming a ball. Keep wrapping the yarn nice and tight until the circumference is about 7 inches. 
Then once you have the desired size, secure the end of the yarn under the other strands using a needle.
Repeat these steps until you have four balls.

Now it is time for the felting process.  
Cut off and use one leg of some pantyhose. Put one of the balls into the toe of the pantyhose and secure it there with some yarn - acrylic or cotton yarn, not wool yarn (or it will felt). Secure all four balls in the pantyhose leg.
Add the balls to a hot washing machine cycle and then into a hot dryer. The hotter the better as it will speed up the felting process.
  

After the first felting process you will notice that the yarn on the balls have become tighter and almost merged together.


Add some more layers of wool yarn to each ball making them the size of tennis balls (the bigger the dryer balls, the longer they will last). Then repeat the felting process.


After the second felting process the dryer balls are ready to use! Put them in the dryer and they are ready to be used time after time. You can also add some essential oils to the dryer balls to make your laundry smell nice.


Wednesday, January 23, 2013

wordless wednesday


photo borrowed from my lovely sister-in-law and brother:)

Monday, January 21, 2013

another year

 
I had a great birthday last week. I had a great day of free meals and hanging out with my husband and friends. I like birthdays ... sometimes though it can bum me out to think about my age and the dreams of what I thought I would have accomplished by the new age etc. But I thoroughly enjoyed this birthday. I am full of excitement and hope for what is to come. I have no idea what that means, but I look forward to seeing the new year unfold. Despite trying times of sickness and deep desires going unrealized (which I may write more about later),  I am also blessed. And I am thankful. I am so in awe of an awesome God who loves me. A God that is all knowing and is perfect in wisdom. My prayer for this year is contentment and joy despite circumstances. He is in control and I want to rest in that.

Here I come 2013 - full of anticipation for what the new year might hold.


milling mondays: 100% whole wheat crackers

 
Since I started milling my own flour, I knew I wanted to at some point start making my own crackers. Since I mill my own flour to ensure all the nutrition stays in the flour thus making healthier breads etc., I thought I should extend that health to crackers as well. Making my own crackers just seemed like it would be difficult and a little crazy:) However, I am glad I tried making them because they are easy to make and they don't take much time. Definitely not a lot of extra effort in order to ensure you have healthy nutrition packed completely whole wheat crackers.
 
 
100% Whole Wheat Crackers
 
modified recipe from the green life pages
 
 
Ingredients
 
1 1/4 cup whole wheat flour (or about 1 cup hard wheat berries)
 
1 1/2 tsp sugar
 
1/2 tsp salt, plus extra for sprinkling
 
1/4 tsp paprika
 
4 Tbs unsalted butter
 
1/4 cup + 2 Tbs water
 
1/4 tsp vanilla
 
recipe yields about 60 crackers


Directions
 
 
Preheat oven to 400F.
 
If you mill your own flour, grind about 1 cup of hard wheat berries in your grain mill. I use my WonderMill


Blend together the dry ingredients - flour, sugar, salt and paprika.
 
Cut in the butter into the dry ingredient mixture. Mix in the butter using a fork or a pastry blender. The flour mixture will be crumbly.
 
Add the water and vanilla to the crumbly mixture.
 
Knead the dough with your hands until it comes together to form a ball.


Split the dough in half.
 
Roll the dough out very thinly (about 1/16 inch) on a pastry mat.

Using a pizza cutter cut the dough into whatever cracker shape you desire.


Using a spatula move the cut dough crackers onto a baking sheet. Either use parchment paper or spray the cookie sheet with cooking spray. (Next time, since the crackers don't rise in the oven and stay the same size, I will probably try cutting the crackers out directly on the cookie sheet).
 
Sprinkle the crackers with salt if desired.
 
Repeat the steps for the other half of the dough.


Bake the crackers for about 6-8 minutes. They bake quickly, so be checking the oven to make sure your crackers aren't burning.


Enjoy! These crunchy crackers are easy and quick to make and full of nutrition.  

Friday, January 18, 2013

seattle


we enjoyed exploring the farmers market in seattle during our anniversary trip

Wednesday, January 16, 2013

wordless wednesday


Tuesday, January 15, 2013

three years

 
we had a great anniversary in seattle

Monday, January 14, 2013

milling mondays: gluten free bread


Prior to milling my own flour, I used to bake my own gluten free sandwich bread. Once I started milling my own flour, I was excited to try my great gluten free bread recipe using freshly milled rice. Gluten free bread can often have a dense texture and bitter taste, so I was thrilled when I stumbled upon this recipe in one of my cook books, Easy Gluten-Free Baking, that makes a great/normal texture and great tasting bread. I would eat this gluten free bread any time over store-bought gluten free bread and it is also much cheaper to make.
 
 
Gluten Free Sandwich Bread
 
modified from Easy Gluten-Free Baking's White Sandwich Bread by Elizabeth Barbone
 
Ingredients
 
Dry Ingredients
1 1/2 cups of brown rice flour (or brown rice if you mill your own flour)
1 cup white rice flour (or white rice if you mill your own flour)
1/3 cup potato starch
1/3 cup corn starch
2/3 cup nonfat dry milk
2 Tbs brown sugar
1 1/2 tsp salt
4 1/2 tsp xanthan gum
 
Wet Ingredients
2 large eggs
1 3/4 cups warm water
1/4 cup butter, melted
2 1/4 tsp (one packet) active dry yeast
 
 
Directions
 
If you mill your own flour, grind the white and brown rice using your mill. I of course use my WonderMill. It is just as easy as milling any other flour.
 
 
Next, combine all of the dry ingredients in a bowl.
 
In a separate mixing bowl combine the wet ingredients and mix until the yeast has been dissolved. I use my KitchenAid stand mixer.
 
Add the dry ingredients to the wet mixture. First blend the ingredients on low for about a minute to make sure all of the ingredients are well combined, and then increase the speed to medium high for 5 minutes.
 
This dough will act differently that most gluten breads - it will stay thick and sticky (but not dry or bulky). If it seems to be too dry then add a little more water.
 
Grease a 9x5 loaf pan and put the dough into the pan. Cover the loaf and let it rise for 1 hour.
 
Pre-heat the oven to 350F
 
When the loaf has risen and the oven is pre-heated, bake the loaf for 1 hour (the internal temperature should be 208-211F when done).
 
Once the bread is done, let it cool on a cooling rack.
 
Enjoy! As I mentioned this gluten free bread does not taste gluten free - it tastes just as yummy as regular bread.


Saturday, January 12, 2013

new year's eve jumbo marshmallow fight

Friday, January 11, 2013

the doctor is in the house


Maya got a doctor's kit for Christmas - which proved a very popular gift:)

Thursday, January 10, 2013

diy thursday: cleaning the washing machine


After remedying the smelly towel situation, I decided to go ahead and just clean my top loading washing machine to make sure it wasn't contributing to the problem. I found a solution on pinterest on how to clean your top loader washing machine that worked well.


First I filled the washer with hot water (the hottest water my washer offers). I then added 4 cups of bleach with no detergent.  Then I set it to the longest wash and spin cycle. After a couple of minutes of letting it agitate I stopped the cycle and let it sit for one hour. After one hour of sitting I let the cycle finish.
 
Right after the cycle was finished I filled the washer with hot water again and this time I added 4 cups of my trusted white distilled vinegar (again no detergent or bleach). I repeated the process of setting it to the longest wash and spin cycle, letting it agitate for a couple of minutes, stopping the cycle for an hour, and then letting the cycle finish.
 
During this whole process I also cleaned off the entire washing machine outwardly and its dispensers where the water wouldn't reach to clean.
 
And voila - I now have a clean and sparkling washing machine. 


This is obviously not something you want to do super often as it requires much water etc., but it is a good idea to do once in a while. 

Wednesday, January 9, 2013

wordless wednesday


Posted by Picasa

Tuesday, January 8, 2013

christmas in stanwood


 we spent Christmas in Stanwood, Washington with Michael's family this year